Friday, May 20, 2016

Procurement Activities

Procurement Activities
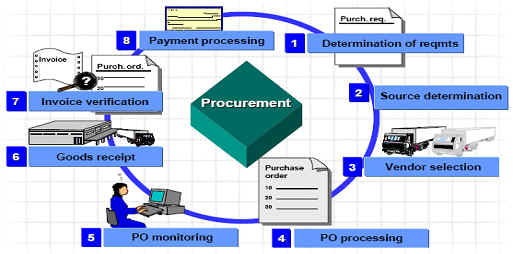
Procurement activities flow is given as below table:
Procurement Activities
Description
Requirement DeterminationIt is the logical subdivision where it is determined that what material or services are required to company, and which supplier can fulfill the requirement.

Outside the system
Creating Purchase RequisitionIt is the phase in which purchasing department is informed about the requirement of items or services required for business purpose. A requisition is a internal document.

Tcode: ME54N (Create PR)
Creating Purchase OrderIt is the phase when order is created from requisition and it is approved and assigned to a supplier.

Tcode: ME21N (Create PO)
Goods receipt/ Invoice ReceivedThe material is received by the company and the condition and quality are verified. In this phase Invoice is received from the vendor.

Tcode: MIGO (Goods receipt)
Invoice verificationThe reconciliation of the invoice and PO is accomplished to confirm they are matching. After verification, the invoice document is created in SAP and locked for the payment process.

Tcode: MIRO (with PO reference), FB60 (not related to PO), F-43
Invoice paymentThere are many methods to perform a vendor payment in SAP. One method is to post Outgoing Payment with Tcode F-53.

Tcode: F-53, F-44, F110


Last updated by Phu Dang, 20 Oct 2017

XLSX Workbench - Excel-based forms in the SAP ABAP environment

1. Short description

XLSX Workbench is a new tool for designing an Excel-based forms in the SAP environment. It is very easy to learn and use, due to a completely visual approach to developing forms (such as SMARTFORMS).

Visual approach of XLSX Workbench allows you to develop printing form even without ABAP skills.

Despite the ease of use, XLSX Workbench is a powerful and very flexible tool and is suitable for development both of simple forms and complicated dynamic forms with pictures, charts, hierarchies, and other formatting features. XLSX Workbench provides a high performance of generation of the resultant file of printing form.

Printing form is being generated with a modern file format .XLSX, which is native for Microsoft Excel (2007 and above), it is also supported by many other programs (eg, Open Office).

Printing form is being generated without using of Microsoft Excel application, it makes possible to get result in the background jobs SAP.

Thursday, May 19, 2016

BADIs

What is BADI?

BADI stands for Business AdIns, BADI  help hook custom enhancements to SAP functionality.


Features:

  • BADI's are Object Oriented
  • They can be implemented multiple times
  • It does not require SAP Software Change Registration
  • No effect on release upgraded on the functioning of BADI's

Define and Implement a BADI

This involved three steps Step 1 Creating BADI Definition: Transaction SE18.
sap badi
Step 2 Define BADI interface: Transaction SE19
sap badi
Step 3 Define a class implements the interface : During implementation creation, a class for implementing the enhancement's interface is also created.
Example:
This example presents the implementation of a BADIs to customize the recipient lists of mail when availability budget checks is active.
In Implementation Guide (spro) you can find the BADI which already provides the interface (FMAVC_EVENT) for abaper to customize a processing via methods of interface (with class implements this interface).

To display all the enhancements, do as following:
  1. Enter the name of your implementation class and then create it.
2. Start the Object Navigator (SE80).
3. Open the package in which an enhancement implementation is defined or is to be created.

Wednesday, May 18, 2016

SAP Business Object


  • An SAP Business Object is the representation of a central business object in the real world, such as an employee, sales order, purchase requisition, purchase order, applicant, invoice, and so on. 
  • A business object is composed of tables that are related in a business context, including the related application programs. The application programs are called “methods” of the business object.
  • Attributes and methods are assigned to a business object. 
  • Attributes are characteristics that specify the business object. The attributes can be modified by the methods that belong to the business object. 
  • Business objects are maintained by SAP in the Business Object Repository (BOR).

Tuesday, May 17, 2016

Events in Workflows

Events
Events are part of business object and are triggered by a possible change in the state of the object.
Workflows are usually started using events.

Event parameters
Event parameters are defined as elements of the event container in the Business Object Builder and
are passed to the event receivers using a binding. The following event parameters are held in the
event container automatically:
_EVT_OBJECT: The reference to the object whose change of state is described by the event.
_EVT_CREATOR: The user name of the party who triggered the event creation.
, etc
To add event parameters, position the cursor on the event ID and select PARAMETERS.

Event Container
The event container contains the event parameters as container elements. If you define triggering events or terminating events for a task, you can specify the binding from the event container to the task container. If you define triggering events for a workflow, you can specify the binding from the event container to the workflow container.

Creating an Event
Choose Tools ---> Business Workflow ---> Development ---> Environment                                        
Alternately you can also go to the transaction SWO1.
Select any custom object and press change

NOTE: During processing of an event, an attempt is made to regenerate the instance triggered by the event. However, for certain events (DELETED, for example), this is not possible since the persistent object has meanwhile been deleted.
If the checkbox “Triggering object does not exist” is set, the object no longer exists after the event is triggered and so runtime objects can no longer be generated for this object.

After adding an event parameter, return to the previous screen and change the release status of the
event. This can be done from Edit > Change Release Status > Object Type Component > to Implemented. After changing status “To Implemented”, change its status to “Released” by the
same process. This indicates that the added event has been released for use by the customers.

Methods of Event Creation 
There are various ways in which events can be created:

  • Function module 
  • Change documents 
Event creation when change documents are written.

  • General status management 
Event creation upon status changes.

  • Business Transaction Events 
  • Logistics Information System (LIS) 
Event creation when an exception situation occurs (LIS exception).

  • Message Control 
Event creation as message type.

  • ABAP classes 
Event creation by calling the method RAISE of the ABAP class CL_SWF_EVT_EVENT or by calling the
method RAISE of an instance of type IF_SWF_EVT_EVENT.

  • Step Event Creator in Workflow Builder
  • HR master data 

Event creation when HR master data changes.

Function Module
You can create events from application or system programs by calling one of the relevant function
modules SWE_EVENT_CREATE or SAP_WAPI_CREATE_EVENT.

The Function Module SAP_WAPI_CREATE_EVENT has the following interface:

EXPORTING
object_type SWETYPECOUOBJTYPE Type of the triggering object
object_key SWEINSTCOUOBJKEY Concatenated, object type-specific key of the
triggering object.
The reference to the triggering object is created
internally from this information and written to the
event container under the element ID _Evt_Object. 
event SWETYPECOUEVENT ID of the event.
The event must be defined for the triggering object
type.
IMPORTING
event_id SWEDUMEVIDEVTID  The event number has a value other than zero if the event manager could establish one or more receiver function modules.
If no receiver could be established, zero is returned as the event number.

Example:
begin_method create_event changing container.
DATA:
  hlevel      TYPE ztb_fpt_wf_usfbk-zversion,
  org_unit    TYPE ztb_fpt_mm001-zorg_unit,
  pr_number   TYPE eban-banfn,
  update_mode TYPE ztb_fpt_wf_usfbk-umode,
  zversion    TYPE ztb_fpt_wf_usfbk-zversion,
  wa_user     TYPE ztb_fpt_mm001,
  pr_type     TYPE eban-bsart.
DATA:
  l_wk_objtyp  TYPE  swr_struct-object_typ,
  l_wk_objkey  TYPE  swr_struct-object_key,
  l_wk_event   TYPE  swr_struct-event,
  l_wk_subrc   TYPE sy-subrc,
  l_wk_eventid TYPE swr_struct-event_id.

swc_get_element container 'ORG_UNIT' org_unit.
swc_get_element container 'PR_NUMBER' pr_number.
swc_get_element container 'UPDATE_MODE' update_mode.
swc_get_element container 'ZVERSION' zversion.
swc_get_element container 'PR_TYPE' pr_type.

* concatenate the key fields
CONCATENATE hlevel
            org_unit
            pr_number
            update_mode
            pr_type
            zversion
       INTO l_wk_objkey RESPECTING BLANKS.

l_wk_objtyp 'ZOT_PR'.
l_wk_event  'EVT_AGREEMENT'.

CALL FUNCTION 'SAP_WAPI_CREATE_EVENT'
  EXPORTING
    object_type l_wk_objtyp
    object_key  l_wk_objkey        
    event       l_wk_event
*   COMMIT_WORK = 'X'
*   EVENT_LANGUAGE          = SY-LANGU
    language    sy-langu
*   USER        = SY-UNAME
*   IFS_XML_CONTAINER       =
  IMPORTING
    return_code l_wk_subrc
    event_id    l_wk_eventid
*   TABLES
*   INPUT_CONTAINER         =
*   MESSAGE_LINES           =
*   MESSAGE_STRUCT          =
  .
swc_set_element container 'HLEVEL' hlevel.
swc_set_element container 'WA_USER' wa_user.
end_method.

The event is not instance-independent so that you must pass the keyfields as parameter for FM to initiate the instance of BOR to be able to call its event. In the workflow builder, if you use Wait step to listen to the event, you must pass the same instance (same keyfields of BO triggered event) into Container Element of Wait step.

Note: Since the asynchronous RFC for calling the receiver function module is not triggered until
after the next COMMIT WORK , you must check the COMMIT WORK Exporting Parameter in your application after the function module for creating an event is called in order for the events to actually be created.


Although both the function modules SAP_WAPI_CREATE_EVENT and SWE_EVENT_CREATE
have similar signatures, it is recommend that you use SAP_WAPI_CREATE_EVENT instead of the
old function module SWE_EVENT_CREATE.

Monday, May 16, 2016

Macro Instructions for Accessing Objects, Attributes, Methods (BOR) - SAP Business Workflow

You can use these macros for simplifying access to Business Object Repository objects.

Prerequisites
The include file <cntain> (Container-Macros) must be incorporated into the program in order to use these macros.

Features
You must declare variables in which an object reference is to be stored with the following instruction:
DATA: <Object> TYPE SWC_OBJECT.

General macros
  • SWC_CREATE_OBJECT <Object> <Objecttype> <Objectkey>.
    Creates an object reference for an object key of an object type.
    You must pass the object-specific key in <ObjectKey> and the ID of the object type in <ObjectType> . You must pass <ObjectType> either as a character string or as a variable declared with LIKE SWOTOBJID-OBJTYPE .
    The object reference created is returned in the variable <Object> . You must declare <Object> with type SWC_OBJECT .
    If the variable <ObjectKey> has the value SPACE , a reference to the object type is returned in <Object> . You can use this to query properties of the object type (attributes, methods, events).
  • SWC_REFRESH_OBJECT <Object>.
    Object attributes that reference a database field are read from the database again when next accessed.
    You must pass the object reference in <Object> . You must declare <Object> with type SWC_OBJECT .
    You should use this macro instruction after execution of methods that can change attributes (for example Edit , Update , Change ).
  • SWC_GET_OBJECT_TYPE <Object> <ObjectType>.
    The object type for the object reference is established.
    You must pass the object reference in <Object> . You must declare <Object> with type SWC_OBJECT .
    The object type is returned in the variable <ObjectType> . You can declare <ObjectType> with LIKE SWOTOBJID-OBJTYPE .
  • SWC_GET_OBJECT_KEY <Object> <ObjectKey>.
    The object key for the object reference is established.
    You must pass the object reference in <Object> . You must declare <Object> with type SWC_OBJECT .
    The object key is returned in the variable <ObjectKey> . You can declare <ObjectKey> with LIKE SWOTOBJID-OBJKEY .
  • SWC_CALL_METHOD <Object> <Method> <Container>.The method defined for an object type is executed on an object of this object type.
    You must pass the object reference in <Object> and the method to be executed in <Method> . You must declare <Object> with type SWC_OBJECT .
    The import parameters of the method are passed in the variable <Container> . The result and the export parameters of the method executed are also stored in <Container> . If the method called raises an exception, the number of the exception is stored in the system variable SY-SUBRC and any values in the variables SY-MSGV1 , ..., SY-MSGV4 .
    An example of a call of this kind can be found in Programmed Call of Method .
    If you pass SPACE for <Method> , the default method is executed.
    You must pass a container even if no parameters are defined for the method called. Therefore you create and initialize an empty container with the following macro instructions:
    SWC_CONTAINER <Container>. SWC_CREATE_CONTAINER <Container>.
  • SWC_GET_PROPERTY <Object> <Attribute> <AttributeValue>. SWC_GET_TABLE_PROPERTY <Object> <Attribute> <AttributeValue>.
    The value of the specified attribute is established. If it is a virtual attribute , this is done dynamically.
    You must pass the object reference in <Object> and the attribute or key field to be read in <Attribute> . You must declare <Object> with type SWC_OBJECT .
    The value of the attribute or key field is returned in the variable <AttributeValue> . SWC_GET_PROPERTY returns a single value, SWC_GET_TABLE_PROPERTY returns a multiline value in an internal table.
    An example of a call of this kind can be found in Programmed Access to an Attribute .
Executing macros on own object
All the macros in the section General Macros can also be executed directly on the object itself in the implementation program. To do this, you replace <Object> with SELF in the macro calls.
ExampleAttribute values of the current object can be read by calling SWC_GET_PROPERTY SELF <Attribute> <AttributeValue>.

Setting an object key
When implementing methods with which an object is created, the object key must be set. The typically applies to the methods Create and Find . Use the macro following macro instruction:
SWC_SET_OBJECTKEY <ObjectKey>.
The object key to be set is passed in the variable <ObjectKey> . An example of a call of this kind can be found in Programming Instance-Independent Methods .
Raising Exceptions
Within the implementation program, you can raise the exceptions defined for a method. Use the macro following macro instruction:
EXIT_RETURN <Exception> <Var1> <Var2> <Var3> <Var4>.

Pass the number of the exception in <Exception> and the four task parameters displayed in <Varn> . The parameters can be SPACE . <Exception> must be declared with LIKE SWOTINVOKE-CODE .

Sunday, May 15, 2016

How To Select Or Reject A Quotation

Step 1)
  1. Select the quotation that's favorable (you want to process it further as it's having the best conditions). Go to ME47 transaction, enter your quotation number.
Step 2) Now you are in the ME47 transaction. Here you can choose the item and go to the item details screen.
  1. Select the item.
  2. Click on the item details icon.
Step 3)
  1. Enter (or choose from the list of available values) B or C for the InfoUpdate field in Quotation data section to update the info record. In this field, you can also find rejection indicator used to reject the quotation item. We will use it to reject the other offer.
InfoUpdate field is used to update the info record in several ways:
  • ' ' (blank) The info record is not updated.
  • 'A' If an info record exists at plant level, it is updated. Otherwise an info record at purchasing organization level is updated.
  • 'B' If plant conditions are allowed for the plant, an info record at plant level is updated.
  • 'C' If plant conditions are not necessary for the plant, an info record at purchasing organization level is updated.
  
  1. Save the data.

Rejecting quotations

You should head back to the report screen. Once there, you can select the other quotation (we want it to be rejected), and repeat the process until you are on the item details screen. You will not enter the information into InfoUpdate field but will tick the "Rej. Ind." check box. By this, you are rejecting the quotation item.
Step 1)
  1. Rejection indicator.
You will be prompted to print the rejection message for the items being rejected so you could inform the vendor of the status of his offer.You can repeat the process for all the vendors and items that are rejected. This now leaves us with one open quotation for the item.
ref: www.guru99.com

Friday, May 13, 2016

Overview Of Quotation

Request for Quotations

Request for Quotations are requests for vendors to provide us information about their best prices, terms and conditions, schedule of deliveries and other information in order to select the best source for our procurement needs (Source Determination).
Below you can see the process flow for quotations in purchasing in SAP MM module.
Quotation process is started with creation of a request for quotation and send the RFQ to the chosen vendor, who then send their quotation or rejection letter. Afterwards maintenance of the quotations to input all the information received from possible vendors. Then we want to compare the offers and select the best suitable one(s) rejecting the others. In SAP, there are several transaction used in the process.

How to create Request for quotation

First we need to create a request for quotation. RFQs can be created by transaction ME41. We can create a new RFQ from scratch, or create one referencing to an existing purchase requisition or outline agreement. If you want to create the RFQ using a reference document, you will just need to click the appropriate button and enter the referencing document number. In this case, we are creating a new RFQ with no reference document.
Step 1) In transaction ME41 , enter:
  1. RFQ type: quotation type (A - standard RFQ).
  2. Language key: language to be used in a quotation (EN - English).
  3. RFQ date: Todays date.
  4. Quotation deadline: this date has to be before delivery date.
  5. RFQ number: enter a number you want to assign to quotation (if you want it to be assigned internally leave this field blank).
  6. Purch. organization: purchase organization (e.g. 0001).
  7. Purchasing group: purchasing group (e.g. 001).
  8. Item category: default is blank – standard item.
  9. Delivery date: requested delivery date.
  10. Plant.
  11. Storage location: SLoc for goods receipt.
  12. Requirement tracking number.
Press ENTER, and you will be located on header data screen.
Step 2)
  1. Validity range: enter the range for the validity period. Other information such as collective number (collective management of multiple documents), deadline for bid submission, closing a date for applications and binding period for quotation.
  2. Collective number – Coll.no is a very important field as you can later compare quotations based on this information, or find RFQs using this number.
  3. You can enter the warranty date if applicable.
  4. Target value: threshold value for warning a message during the creation of the contract release order.
You should inspect the toolbar to see which screens can be called by using the icons.
Step 3) Among the icons in the toolbar you will find  "Vendor Address" button, where you can:
  1. Choose the appropriate vendor. If it's one time vendor, after entering vendor number you need to specify vendor address.
Step 4) In the toolbar, you will also find the overview button which calls the item overview screen.
Item overview screen is the place where you can enter item information, materials, quantities...
  1. Material number: insert materials to be procured.
  2. RFQ quantity: enter needed quantity and unit of measure.You can inspect more screens from toolbar and save the document.
You can always go back to edit the request for quotation using the t-code ME42 or display it's information using ME43. Repeat the above process to send the RFQ to all of the vendors from which you are requesting a quotation.
If you have maintained a collective number in your quotations (we have used 190123), you can review all of the quotations for the collective number by using transaction code ME4N.
Reference: www.guru99.com

SAP Script: Standard Text (SO10)

Q & A:

Q: why text in so10 is grayed out?
A: text as symbol is grayed out.

Q: This issue causes my text to be deleted (html tags): "Unpermitted character formats will be deleted;
continue anyway? "
A: Unanswer

A: I cannot print by output type?

Its becuase you might not be having data for output like Output type,language etc. (these data is stored in NAST table)
Goto VA22- Extras-Output-Header-Edit
Insert output type, no of messages etc & save --> Further data.
Now goto VA23 & Select issue output to-select your output Type -Tick Print Preview-YOU WILL See print preview.


Tuesday, May 10, 2016

I_OI_SPREADSHEET

This class provides document management for sheet of Excel File.

Method:
  • GET_SHEETS                        Get the names of all worksheets in Excel File
DATA: IT_SHEETS       TYPE          SOI_SHEETS_TABLE.
CALL METHOD IREF_SPREADSHEET->GET_SHEETS
   EXPORTING
     NO_FLUSH = ' '
   IMPORTING
     SHEETS   = IT_SHEETS
     ERROR    = IREF_ERROR.
  • SELECT_SHEET                   Activate a Sheet
CALL METHOD IREF_SPREADSHEET->SELECT_SHEET
     EXPORTING
       NAME  = WA_SHEETS-SHEET_NAME
     IMPORTING
       ERROR = IREF_ERROR.
   IF IREF_ERROR->HAS_FAILED = 'X'.
     CONTINUE.
   ENDIF.
  • SET_SELECTION                    Set range to read the data
CALL METHOD IREF_SPREADSHEET->SET_SELECTION
     EXPORTING
       TOP     = 4
       LEFT    = 1
       ROWS    = 2000
       COLUMNS = 8.
  • INSERT_RANGE                     Insert a New Range
CALL METHOD IREF_SPREADSHEET->INSERT_RANGE
     EXPORTING
       NAME     = 'Test'
       ROWS     = 2000
       COLUMNS  = 8
       NO_FLUSH = ''
     IMPORTING
       ERROR    = IREF_ERROR.
  • GET_RANGES_DATA              Get the data of a range in spreadsheet
DATA : L_IT_RANGE  TYPE SOI_DIMENSION_TABLE,
            L_WA_RANGE  TYPE SOI_DIMENSION_ITEM.
* create data range to selected
L_WA_RANGE-ROW     = 2.
L_WA_RANGE-COLUMN  = 1.
L_WA_RANGE-ROWS    = 2000.
L_WA_RANGE-COLUMNS = 9.
APPEND L_WA_RANGE TO L_IT_RANGE.

CALL METHOD IREF_SPREADSHEET->GET_RANGES_DATA
     EXPORTING
       RANGESDEF = L_IT_RANGE   "indicate range in which data to be read
     IMPORTING
       CONTENTS  = IT_DATA             "Internal table to contain the data
       ERROR     = IREF_ERROR
     CHANGING
       RANGES    = IT_RANGES.


I_OI_DOCUMENT_PROXY

General Document Interface

Each instance of the interface I_OI_DOCUMENT_PROXY administers and controls a document that you want to open in the office application. If you want to open several documents at once, you need an instance for each document.
You can create an instance of I_OI_DOCUMENT_PROXY using the interface I_OI_CONTAINER_CONTROL.
The interface exposes methods that you can use to control the document from your application program (for example, open, close, save).

They are divided into the methods that all OLE2 desktop applications provide, and those that can also be used through a standard interface. The following tables provide an overview of these methods:

  • Method:
    • OPEN_DOCUMENT
      • CALL METHOD IREF_DOCUMENT->OPEN_DOCUMENT
            EXPORTING
              DOCUMENT_TITLE 'Excel'
              DOCUMENT_URL   file path
              OPEN_INPLACE   'X'
            IMPORTING
              ERROR          IREF_ERROR.
    • GET_SPREADSHEET_INTERFACE         
      • Returns an Interface Reference
      • The return of interface Reference I_OI_SPREADSHEET IREF_SPREADSHEET is used to access the spreadsheet of excel file.
      • CALL METHOD IREF_DOCUMENT->GET_SPREADSHEET_INTERFACE
            EXPORTING
              NO_FLUSH        ' '
            IMPORTING
              ERROR           IREF_ERROR
              SHEET_INTERFACE IREF_SPREADSHEET.

Monday, May 9, 2016

Q&A (SAP Query)


Q: How to create a check box in SAP Query SQ01/SQ02 ?

A: This can be done in Infoset itself (SQ02).

Select the pushbutton labeled Extras.
Select the tab labeled Selections, then click on Create icon.
On Create Selection popup, enter the name of the field say 'test' and select radiobutton Parameter.
On next popup, enter description and selection text.  For the format option, enter type C and length 1For Extras enter "AS CHECKBOX"

See this image:
Capture.JPG
Now the code you need to write inthe 'Record Processing' section of the Code tab.
1.JPG


Save the code.
Generate Infoset.

Run transacction SQ01.
Execute with the query made on this infoset.

You will find the checkbox in the selection-screen.
Check this and execute for desired result.


Workflow: Asynchronous and Synchronous Method

Asynchronous object method: You must define at least one terminating event for tasks that refer to an asynchronous object method . At runtime, the relevant work item is only terminated when a terminating events occurs (you may trigger the terminating event in your method implementation).

Synchronous object method: You can define a terminating event for tasks that refer to a synchronous object method . At runtime, the relevant work item is terminated when the synchronous method has been successfully executed or when one of the terminating events occurs.

A terminating event applies to one instance of a task only, that is, to one specific work item. The work item in turn refers to one specific object for the object type. You must specify a connection to this object for the terminating event. The object is specified in the _WI_OBJECT_ID element.

Thursday, May 5, 2016

SAP Query Tutorial

SAP Query is SAP’s tool to define and execute once own reports without knowing ABAP programming language.

The whole process comprises of 3 steps:
- First create an user group SQ03.
- Second, create an infoset SQ02.
- Third, create a query SQ01.

Now let's go into details of each step:
  • Create a user group SQ03
    • The technical definition of “User Groups” is a collection of SAP users who are grouped together.
    • A user’s assignment to a user group determines which queries he or she can execute or maintain. Additionally, it designates which InfoSets the user can access.
    • Basically, Query Groups permit users to create, modify, and execute reports in a certain area within R/3.


  • Create an Infoset SQ02
    • An InfoSet describes which fields of a data source can be reported on in queries. InfoSets are assigned to user groups.
    • Steps:
      • Navigate to the Infoset Initial screen using transaction code SQ02. Type the InfoSet name that you will be creating, ZMYINFOTEST, and select the Create button.
      • Type the name of the infoset, e.g. TEST FOR INFOSET. Choose the data source and press ok button.
      • You will be provided with a screen as shown below. Select insert table icon in application tool bar. A popup will appear, give the table name to be inserted and select OK button.
      • For maintaining the infoset, click on Infoset button. A popup opens asking what fields should be there in field groups. Select radio button Create empty field groups and press Ok.
      • Two empty field groups got created. In the left pane, we find the list of fields in the tables we insert as previous steps.
                       
  • Drag and drop the fields from the left pane onto the field groups.
  • You can also add codes into the program when neccessary. Choose Extras → Code, select appropriate section/event to put the code in.
  • Next, you need to generate the InfoSet by selecting the Generate button (the red beach ball) from the application toolbar. A message appears in the status bar saying that the InfoSet ZMYINFOSET generated.
  • Go back to the main screen of SQ02 by clicking Back Button on standard toolbar. Click on Role/User Group Assignment button to assign the infoset to a specific user group.
  • Create a query SQ01
    • The InfoSet Query is designed for basic users to retrieve simple single-use lists of data from your database.
    • Unlike the SAP Query all query information - including the selection criteria for InfoSet Query reporting - is available on a single screen.
    • Steps:
      • Navigate to the Queries Initial screen using transaction code SQ01. (to display the queries of an user group, you first enter that user group in tcode sq03, then you can see its query in tcode sq01.)
      • Give ZINFO_QUERY as Query Name and Click on InfoSet Query button. You are prompted to select your InfoSet (data source) from a dialog box.
      • If you want to look up for InfoSet of a Query (which was already assigned to InfoSet), you can find it at the column InfoSet from the display list.

  • The main screen of the InfoSet Query appears. The main screen contains three areas: The actual InfoSet from which you select and choose your fields, the sample report display, and the Selection screen values.
  • For creating your report, check the Output box next to each field.
  • Choose fields for the Selection screen by marking Selection check box, and click the output button to execute the report.

SAP giới thiệu mã hỗ trợ AI trong ngôn ngữ ABAP riêng của mình

SAP đã ra mắt một loạt tính năng mã hỗ trợ AI trong môi trường phát triển ứng dụng dựa trên đám mây của mình, đồng thời tham gia vào danh sá...