Sunday, December 25, 2016

Internal Tables

Internal table is a data object in ABAP that exists only at run time of a program. It means when the program execution is complete then the internal table will be lost. We use internal table to store database table data after fetching it by a select query. The ABAP run-time system dynamically manages the internal table’s memory. It means we developer do not need to work on memory management of internal table.

Syntax: 
TYPES <internal_tab> TYPE|LIKE <internal_tab_type> OF <line_type_itab> WITH <key> INITIAL SIZE <size_number>.

There are 3 types of internal table as below:

1. Standard Table

Standard tables are our regular, all-purpose, all-around ABAP internal tables. When you define an ITAB just like “…type table of…” , you are actually defining a standard table. They are simple, easy-to-use; but usually not the best option in terms of performance.
Use standard tables if…
  • …you will “LOOP” without any conditions; or
  • …you will “READ TABLE” using an index (like READ TABLE … INDEX 5)
Here is a simple example on how to use standard tables:
types: tt_mara type standard table of mara.
data: gt_mara type tt_mara,
      gr_mara type ref to mara.
* How to append data
append initial line to gt_mara reference into gr_mara.
gr_mara->matnr = ‘A12345’.
“…
* How to loop
loop at gt_mara reference into gr_mara.
“whatever
endloop.
* How to read table
read table gt_mara reference into gr_mara index 1.

2. Hashed Primary Key

OK, things are about to get excited now; so pay attention!
Just like defining a primary key on a database table, we can also define a primary key on an ITAB for faster data access. “Hashed key” is a primary key type we can define on an ITAB.
Use hashed keys if…
  • …you will “READ TABLE” with conditions
  • …you are sure that condition fields are unique
Here is a simple example:
types: tt_marc type hashed table of marc
       with unique key primary_key
       components matnr werks.
data: gt_marc type tt_marc,
gs_marc type marc,
gr_marc type ref to marc.
* How to append data
gs_marc-matnr = ‘A12345’.
gs_marc-werks = ‘1200’.
“…
insert gs_marc into table gt_marc.
“…
* How to read
read table gt_marc reference into gr_marc
with unique key primary_key
components matnr = ‘A12345’
werks = ‘1200’.
In this example; we are sure that MATNR + WERKS will always be unique in GT_MARC. If we intend to access this ITAB using those fields within a “READ TABLE” statement, having a hashed primary key is the answer for fastest data access.
If you use a hashed key, data access speed is independent from ITAB size. This means; an entry in GT_MARC with 1.000.000 lines will be accessed as fast as an entry in GT_MARC with 10 lines.
Please note that we can’t use pointers when appending data into GT_MARC:
append initial line to gt_marc reference into gr_marc.
gr_marc->matnr = ‘A12345’. “ SHORT DUMP!
Once you append GT_MARC, the keys (MATNR + WERKS) are already indexed; so you can’t change them any more. Imagine GT_MARC like a database table, and you’ll have an easier time getting used to this logic: After inserting a record into the database table MARC, you can’t change MATNR + WERKS again, can you?

3. Sorted Primary Key

Sorted tables follow a similar logic like hashed tables, but for a different purpose: We use them to “LOOP” instead of “READ TABLE”.
Use sorted primary keys if…
  • …you will “LOOP” with conditions
  • …you are sure that “WHERE” condition fields are unique
Here is a simple example:

TYPES: tt_marc TYPE SORTED TABLE OF marc
                                      WITH UNIQUE KEY primary_key
                                            COMPONENTS matnr werks.
DATA: gt_marc TYPE tt_marc,
gs_marc TYPE marc,
gr_marc TYPE REF TO marc.
* How to append data
gs_marc-matnr = ‘A12345’.
gs_marc-werks = ‘1200’.
“…
INSERT gs_marc INTO TABLE gt_marc.
“…
* How to loop
LOOP AT gt_marc REFERENCE INTO gr_marc
                               USING KEY primary_key
                               WHERE matnr EQ ‘A12345’.
ENDLOOP.
Please note that we didn’t use *all* the fields in the primary_key (MATNR + WERKS). Partial access (only with MATNR) is also possible.
Following the same logic in hashed tables, we got to be sure that MATNR + WERKS are unique in GT_MARC. Due to the same reasons in hashed tables, we can’t use pointers when appending data into GT_MARC.

Secondary Indices

Just like a database table can have a primary key + indices, an ITAB can (optionally) have a primary key and (optionally) any number of secondary indices. Secondary indices are added advantage for Internal Tables with huge data.
This makes sense when you need to access an ITAB using “READ TABLE” and “LOOP” simultaneously.
Here is a simple example:
types: tt_mseg type standard table of mseg
                                with unique hashed key k1 components mblnr mjahr zeile
                                with non-unique sorted key k2 components matnr.
data: 
  gt_mseg type tt_mseg,
  gs_mseg type mseg,
  gr_mseg type ref to mseg.
* How to append data
gs_mseg-matnr = ‘A12345’.
“…
insert gs_mseg into table gt_mseg.
* How to read
read table gt_mseg reference into gr_mseg
with table key k1
components mblnr = ‘1234567890’
mjahr = ‘2014’
zeile = ‘0001’.
* How to loop
loop at gt_mseg reference into gr_mseg
                                           using key k2
                                           where matnr eq ‘A12345’.
  “whatever
endloop.
In this example, GT_MSEG doesn’t have a primary key. We could have defined a primary key using MBLNR + MJAHR + ZEILE; however, I didn’t do it due to demonstration purposes – having a primary key is optional in ITABs.
The first key, k1, is a unique hashed key. We will use this key to access the table using “READ TABLE” statements, and we promise SAP that each MBLNR + MJAHR + ZEILE combo will be unique. Please note that all hashed keys *must* be unique, you can’t define non-unique hashed keys.
The second key, k2, is a non-unique sorted key. We will use this key to access the table using “LOOP” statements, and we tell SAP that MATNR values will not be unique. Please note that sorted keys can be unique or non-unique. Unique sorted keys provide better performance though.

Delete data in Internal Table

Syntax:

DELETE it_tb WHERE field ...

Modify data in Internal Table

In case there are multiple data in lpo_i_errtmp we must use index sy-tabix.
    LOOP AT LPO_I_ERRTMP INTO L_WA_ERRTMP.
      L_WA_ERRTMP-BANFN LPI_BANFN.
      MODIFY LPO_I_ERRTMP
        INDEX SY-TABIX
        FROM L_WA_ERRTMP
        TRANSPORTING  BANFN.
    ENDLOOP.

If we don't use sy-tabix in a loop, we must have the where condition:
*    LOOP AT LPO_I_ERRTMP INTO L_WA_ERRTMP.
      L_WA_ERRTMP-BANFN   LPI_BANFN.
      L_WA_ERRTMP-MESSAGE L_MESSAGE.
      MODIFY LPO_I_ERRTMP
        "INDEX SY-TABIX
        FROM L_WA_ERRTMP
        TRANSPORTING BANFN MESSAGE
        WHERE MESSAGE IS INITIAL.
*    ENDLOOP.
Tuesday, December 13, 2016

MIGO - Goods Receipt/Goods Issues

Goods movements can be performed in Inventory Management using:
  • Transaction MIGO
  • The inventory
  • BAPIs
    The system does not support batch input.

Inventory Management
Procurement process starts with gathering requirements and ends with procuring goods from vendors. Once goods are procured from vendor they need to be placed in company’s premises in correct place so that they can be consumed when required. This introduces the term known as inventory management. Inventory management deals with placing and handling stock received from vendors in correct place within company’s premises. The key points about inventory management are as follows:
  • Inventory management deals with management of stock either on value or quantity basis.
  • Planning, entry and keeping records of all goods movement comes under inventory management.
  • Goods movement will create a document that will update all stock quantity and value in inventory that is known as material document.
  • Material document will be referred by a document number and document year.
Inventory management deal with the following terms which are as follows:
  • Movement Type
  • Goods Receipt
  • Reservation
  • Goods Issue

Movement Type

Movement type describes the type of stock posting in inventory. It represents the posting in stock is due to which type of order like whether stock is posted against goods receipt or goods issue. The important movement types in sap mm are as follows:
  • 101 - Goods receipt for purchase order or order
  • 103 - Goods receipt for purchase order into GR blocked stock
  • 201 - Goods issue for a cost centre
  • 261 - Goods issue for an order
  • 301 - Transfer posting plant to plant in one step
  • 305 - Transfer posting plant to plant in two steps - placement in storage
  • 311 - Transfer posting storage location to storage location in one step
  • 313 - Stock transfer storage locations to storage location in two steps - removal from storage.
Movement types can be reached out by following the below steps:
Path to reach Movement Type:
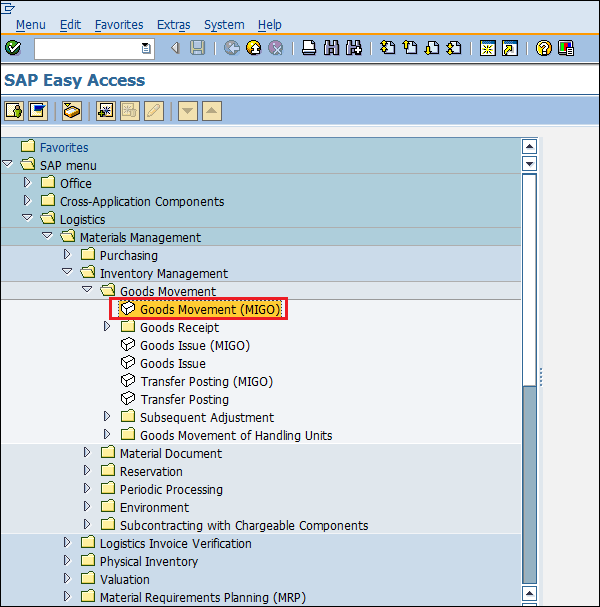
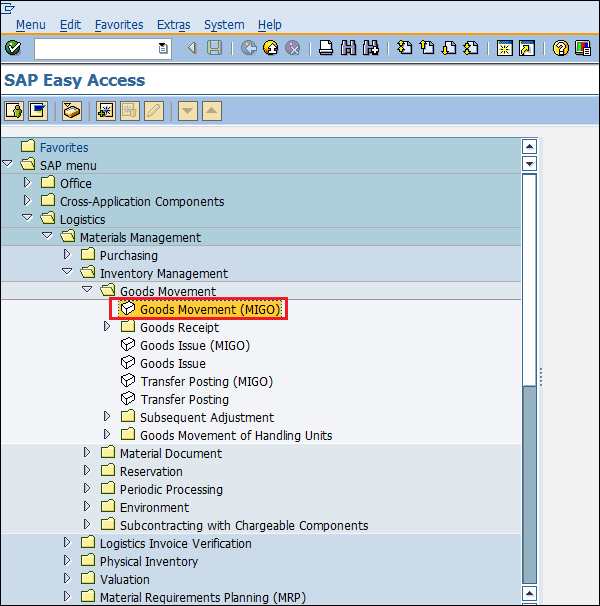
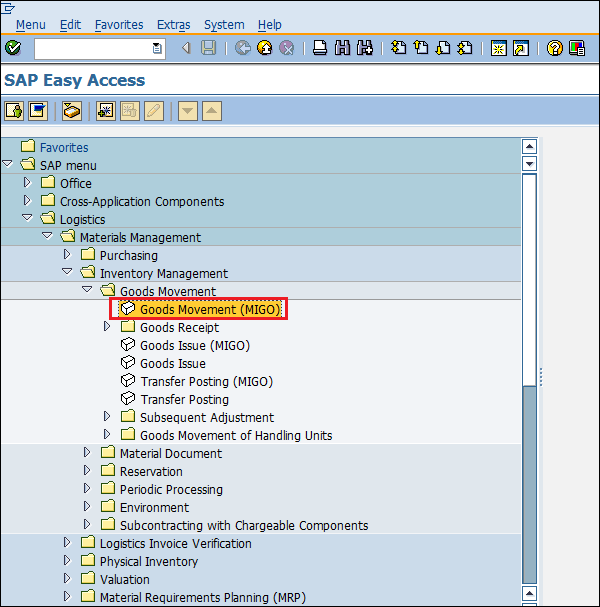
Logistics => Materials Management => Inventory Management => Goods Movement => Goods Movement (MIGO) 
TCode: MIGO
On SAP Menu screen select Goods Movement (MIGO) execute icon by following the above path.
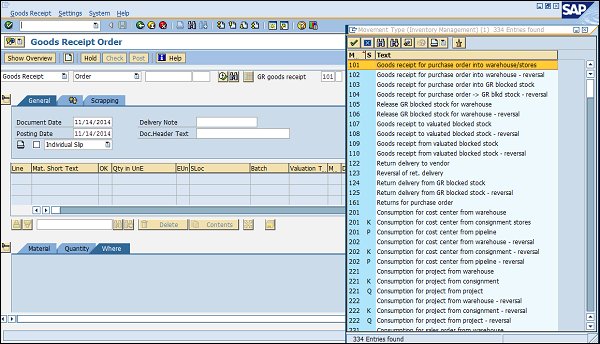
SAP IM movement type
Select GR Goods Receipt drop-down. You will get a lot of standard movement types and you can choose one according to your requirement.
SAP IM movement type


Goods Receipt

Goods receipt is the phase in which the material is received by the ordering party and the condition and quality are verified. Depending upon the movement type stock is posted in inventory with the help of goods receipt. Goods receipt will show increase in warehouse stock. Goods receipt has two scenarios which are as follows.
  • Creation of Goods Receipt
  • Cancellation of Goods Receipt

Creation of Goods Receipt

Goods receipt can be posted by following the below steps.
Path to post Goods Receipt:
Logistics => Materials Management => Inventory Management => Goods Movement => Goods Movement (MIGO) 
TCode: MIGO
On SAP Menu screen select Goods Movement (MIGO) execute icon by following the above path.
SAP create GR path
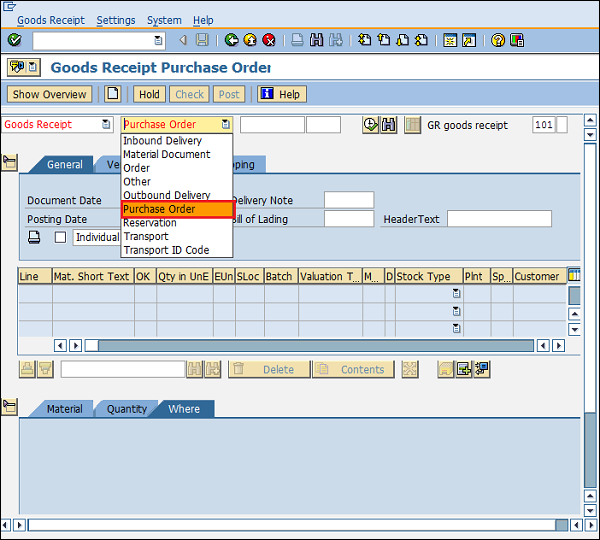
Goods receipt can be posted against various documents. Select the required document from the drop-down. For example in this case we are selecting purchase order. Select the movement type according to the requirement.
SAP IM GR Post
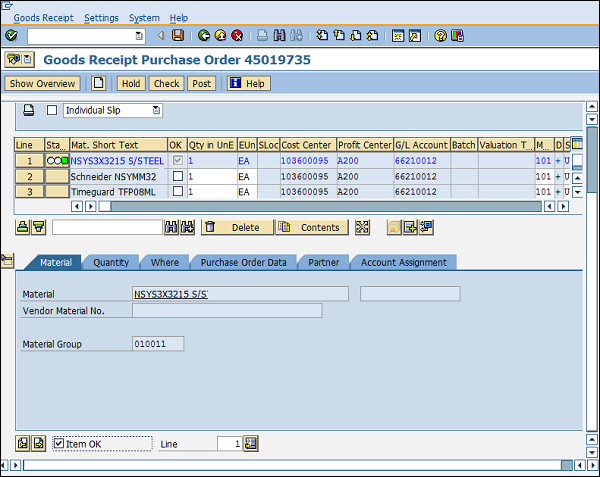
It will fetch all the details from the selected reference document like material, quantity, plant. Select check tab to check the document. Then click on save. A material document number will be generated. Goods receipt is now posted against a purchase document.
SAP IM Gr Post

Cancellation of Goods Receipt

Sometimes goods receipt is not posted correctly. So goods receipt needs to be cancelled and it can be cancelled by following the below steps.
Path to cancel Goods Receipt:
Logistics => Materials Management => Inventory Management => Goods Movement => Goods Movement (MIGO)
TCode: MIGO
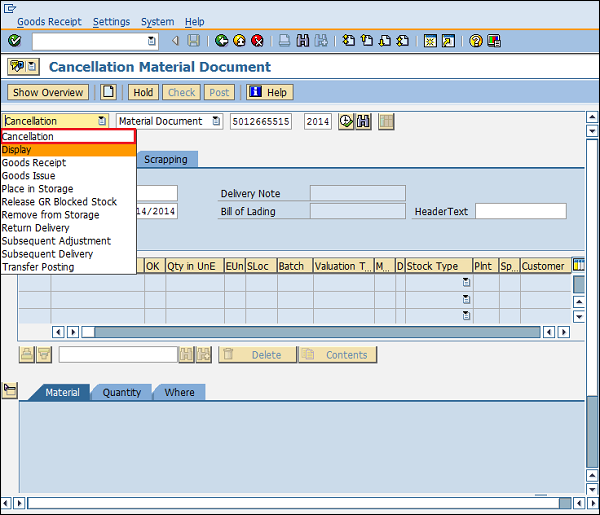
On the same MIGO screen select from drop-down Cancellation against a material document number. Provide the material document number.
SAP IM cancel GR path
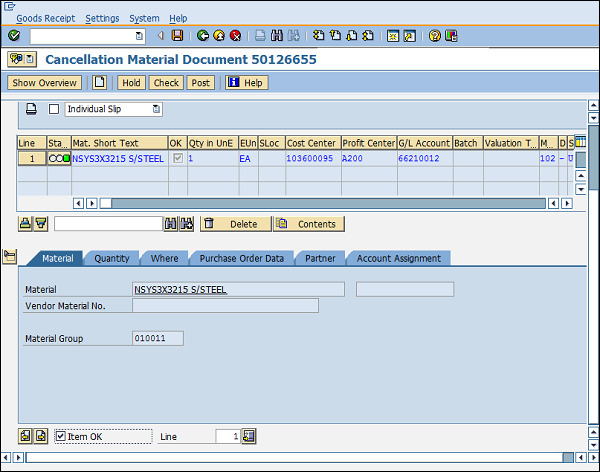
It will fetch all the details from the material document. Select check tab to check the document. Then click on save. A material document number will be generated. Goods receipt is now cancelled.
SAP IM cancel GR

Goods Issue

Goods issue means moving stock out of inventory that may be due to several reasons like withdrawing of material for sampling or returning the goods back to vendor. So, goods issue will result in decrease in quantity in warehouse. Goods issue can be done by following the below steps.
Path to post Goods Issue:
Logistics => Materials Management => Inventory Management => Goods Movement => Goods Movement (MIGO)
TCode: MIGO
On SAP Menu screen select Goods Movement (MIGO) execute icon by following the above path.
SAP IM GI Path
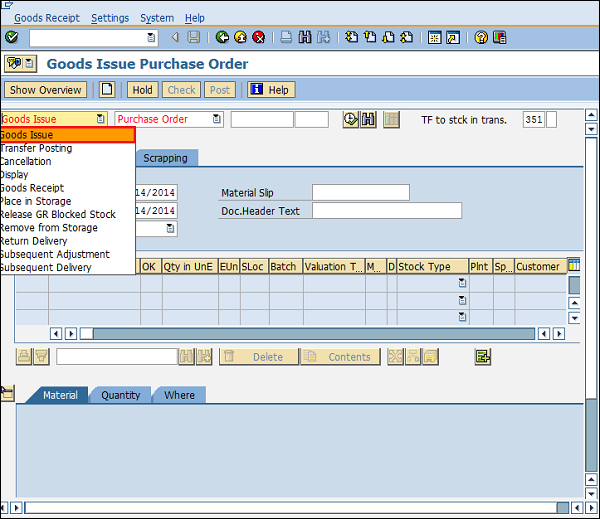
Select goods issue from drop-down. Goods issue can be posted against various documents. Select the required document from the drop-down. For example in this case we are selecting purchase order. Select the movement type according to the requirement.
SAP IM GI select
It will fetch all the details from the selected reference document like material, quantity, plant. Select check tab to check the document. Then click on save. A material document number will be generated. Goods Issue is now posted against a purchase document.

Saturday, December 3, 2016

Authorization

Authorization Objects  
Authorization Object, as the name itself suggests, is a method of restricting users to access any particular application created in the system. It could simply be: denying user for viewing confidential data on-screen or denying access to certain transactions.
Taking this feature into consideration, SAP gets the flexibility to decide at run-time whether a particular user is supposed to access a given application or not.

To get an in-depth picture on the Authorization and the way it works, we’ll look at an example which would demonstrate the use of Authorization Object and the way to use.

The authorization object containing various fields like 'Activity', etc. which grant access(e.g. Activity - 03 will give display access for that particular authorization object.


Profile
Grouping together of authorizations (max 150 authorizations in one profile).


Role
Container of Profiles (makes it easier to track, since profiles have difficult nomenclature and can hold only 150 authorizations)

Use Tcode SUIM to display their informations (profiles, auth. object, roles)

Example:
Requirement – We have a few Z-tables in our system that consists of confidential data, which cannot be accessed by all users. Only authorized persons can have access to the data. So, in case these tables are being used in any program, for display/write purpose, that program would be executed only by Authorized users. Please make sure to disable Table Entries, while creating tables, and not to create any Table Maintenance Generator also. Only this program would be used to perform read/write operations on the table.
Resolution – We’ll see, step by step, what all needs to be done in order to fulfill the mentioned requirement.  
Giving authorization to access (read / write) into z-tables  
Steps:  
1.     To begin with Authorization Object, we’ll enter the Tcode: SU21. Here, we will create the following, in the order shown:  
                  I.      Object Class
                  II.     Authorization Object  
 
2.     On clicking the Object Class (as shown in the above screen shot), you’ll see the window shown below. Enter the Object class name, description & click on SAVE. You can also use available objects, to create your Authorization Object. Like incase of HR module, you can make use of Object Class “HR”, then you need not create one.
3.       Once you create Object class (E.g. Test), you’ll see a folder with that name in the list. Now your object class is ready. We will need this Object class to encapsulate the Authorization object that we will be creating. Click on the Object created, and then click on “Create - Authorization Object” (shown in the figure step 1). On clicking, you’ll see the below shown screen.
Give respective field name, in our case, PERNR (Employee Number), as shown in the above diagram. We will be keeping a check on the employee number, and see if the employee has authorization to access the report (made to view z-tables) or not.  
4.       Now, we need to create a Role, inside which we will attach our Authorization Object. Enter Transaction code: PFCG to create a role.  
 
Select the “Authorizations” tab. And Click on the icon next to “profile name”, as shown in the figure above. On the click of that icon, the system will generate a Profile name and a description for the same.  
5.       Click on the “Change authorization data” as shown in the figure below:  
 
You’ll see a new screen with the Role Name on top left. Here you will have to add your ‘Authorization Object’ that was created in SU21.
6.Click on the “Manually” button shown in the toolbar, to add the Authorization object, as shown in the figure below. Here you can add your Authorization object in the list and press enter.  
 
  1. Now you need to add values (Employee numbers) in your object, for those who would be given authorization. In our case, we will put a “*” symbol (to allow the system to provide access to any employee, which is Assigned this role).
   
  1. Press Save and then Generate the profile by clicking on ‘generate’ icon.  
 
  1. Finally you come out of the screen pressing back button. And you will see the Authorizations tab with a Green symbol, meaning, Authorization object has been assigned and the role can be used.  
 
  1. After these steps, if you want to give authorizations to say Employee No.: 96. Go to Transaction SU01, click on the Roles tab and assign our role name, in our case : test_role.  
 
This way, you can assign this role to all those users, who are supposed to be authorized to access the report (for data entry in the table).  
  1. Finally, in the main program, which has been created, we need to write a small code, as shown below, which will decide if that employee is authorized or not:  
REPORT  ZCHECK_AUTH.
DATA : L_PERNR TYPE PERNR_D.

SELECT SINGLE PERNR
INTO L_PERNR
FROM PA0105
 WHERE UNAME EQ SY-UNAME
AND USRTY EQ '0001'
AND BEGDA LE SY-DATUM
AND ENDDA GE SY-DATUM.

AUTHORITY-CHECK OBJECT 'Z_OBJECT1'
        ID 'PERNR' FIELD L_PERNR.
IF sy-subrc <> 0.
   MESSAGE 'No authorization' TYPE 'E'.ELSE.**** Here you can have the Query to view the table or *****perform any action related to the Z-tables
   MESSAGE 'Congrats! You are authorized' TYPE 'I'.
ENDIF.  
If the user passes this authorization check, the return code SY-SUBRC is set to 0. Hence, users who are not assigned the Role, if they try to access this report; they’ll not be able to do the same.  
This way, you can provide authorizations on any Z- objects.


SAP giới thiệu mã hỗ trợ AI trong ngôn ngữ ABAP riêng của mình

SAP đã ra mắt một loạt tính năng mã hỗ trợ AI trong môi trường phát triển ứng dụng dựa trên đám mây của mình, đồng thời tham gia vào danh sá...